The modern advocate for sawbenches is Christopher Schwartz at Popular Woodworking Magazine. An he has many iterations on sawbench design and use at that site.
The purpose of a sawbench is for using handsaws. To do this properly, you need to be able to use your weight to hold the material steady and to cut. And the traditional workbench that is about wrist high is really for planing and power tools and is too high for this. The sawbench should be about knee high so you can kneel on top of material on top of the workbench. In addition, some designs have a notch at the front for use when ripping boards (cutting with the grain). Some have a slot in the middle for supporting pieces on both sides. Some have splayed legs, others straight. I choose to use a design from the Timber Frame Tools blog, which is based on a design at the Dan's Shop blog. This version is made up of 2X6s (with 2X4s for stretchers). I liked the idea of straight (thick) legs, so I could use it as an actual sitting bench as well. And I have not gotten to the point I could cut good mitres with any degree of accuracy.
I got a 10' 2X6 from the local Lowes, and they cut it down for me. I was going for 24" top, and 17" tall. The height was based on me going around the house and kneeling on chairs until I found one that seemed to be the right height for kneeling, with allowances for shoes and some material thickness. The length was based partly on the fact that I needed everything to fit in a 10' board, and by the fact that this is going to have to live underneath my workbench and the workbench top was 24" deep.
Step one is to make the legs. Each leg is made of edge glued 17" 2x6s. There is a notch in the bottom of the legs to help with stability (I don't think there is any flat-level surface in the house, the space here helps keep the rocking under control.) In addition, I cut notches where the top will go, with a spacer in the middle. The slot in the spacer will have a 1/2" pipe clamp, to serve as a vice.
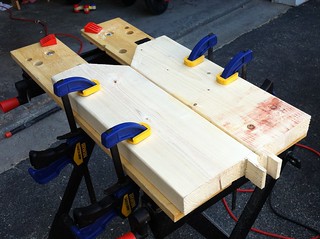
Next for the legs is to cut some notches for the stretchers. One option is to put the stretchers up against the top. I chose to put them a couple inches below so that I would have some room for clamps in any direction along the top.
Next to work on the top. The boards were somewhat cupped, so I (and my father-in-law) spent some time planing them smooth. I put a notch in the top as well. While I could say that it is for ripping wood, the real reason is that I found a split in one side of the top, and cutting out the notch to get rid of the split.
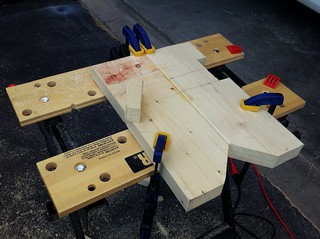
Now that the pieces were all cut, time to put everything together. First the stretchers. The notches were good enough so that they fit in snug, and I could test the placement. The stretchers were sized to be a 2x4 we had laying around cut in half, so 19". I made it so that it was about 1" behind the notch in the front, and 2" from the back. These were then put in with glue and then I screwed them in. Next was the top. Since the notch for this was sized, this was glued on as well. For this, I wanted the glue to harden before screwing them in. (I did not worry about the stretchers because the fit was so tight the screws were not going to knock them out of alignment.) Then I clamped everything together with speed clamps and a pipe clamp.
The next day, I put in screws help hold the top to the legs. First, I used a 1/2" spade bit to make a well for the screw (to keep the screw head below the top of the bench). Then used the cordless drill to drive in the screws.
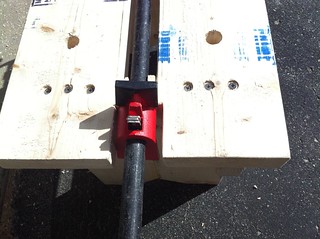
Last step, I put in two pairs of bench dog holes. These are to work with the pipe clamp to serve as a vice for holding material. (something I have not put onto my workbench) I rather like the pipe clamp trick. The idea is what is usually the backside can rotate in any direction, so you use the clamp side to hold onto the workbench and the back side to hold the material (or the reverse). The bench dogs can also be used to hold material against the clamp. The pipe clamp I got already had padding, so a wood block is optional. (or if I want a wide surface to clamp with)

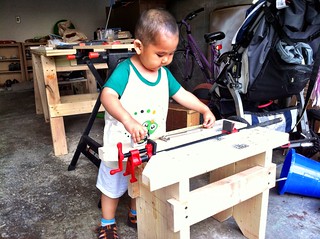
At the Timberframe Tools site, he gives this an alternative name as the "Toddler's Workbench", because it looks like a small version of a real workbench (straight legs, bench dog holes) so his son can play with it. So does mine :-)
Some things for next time around. I need to learn how to cut notches the long way through lumber. It would be better if the top had a slot so that it was seated in the legs so there is wood providing lengthwise support, not only glue and screws. Also, I messed up the slot in the middle. I needed it to be the width of the clamp housing, not the with of of the clamp (or of a board which was used in the original design). I got it to work by going back and making the slot wider, but I could have used that width to make the pipe holder slot stronger. I'll probably stain it with Danish oil. And after I've used it a few times with bench dogs, I may put in another pair or two of bench dog holes. But I'm happy with this one.
1 comment:
Seeing this way too late. Nice work on this. I like the design improvements you made. Mine are a dozen years old now and I still use them practically every time I am in the shop.
Post a Comment