Sunday, July 14, 2013

A two-step step stool

We had some plywood left over after the small scale handyman totes (largely because the big box home center gave us another piece after botching the cutting so badly).  So I decided to something quick and dirty.  A step stool.  My son is not quite tall enough to use the faucet in the main floor bath room.  There is one step stool we have that can get him up, but it is too high for him to step up to it.  Solution, build a two-step step stool.  I laid out a plan based on one from Ana White.  Goal:  Make the step stool, but keep everything within the plywood sheet we have.

Keeping it within the plywood meant that it could only be 12 3/4" high (12 inches because both sides have to fit inside 24", the 3/4" comes from the width of the plywood).  Two 6" deep steps, and roughly 12" wide (based on the need to get both the steps and the supports out of the same 24" wide piece of plywood).
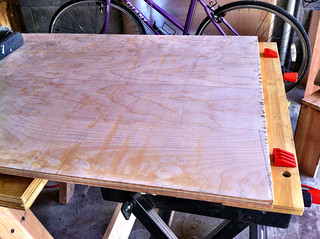

Layout the wood
Laying out the cuts

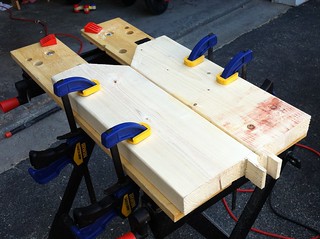
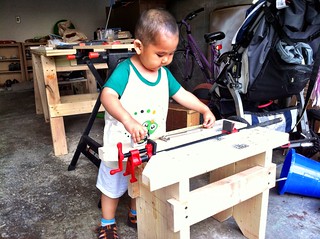
The key for cutting something this large is to make sure both sides of the cut are supported.  So I used my workbench on one side and the Black & Decker Workmate on the other.  However, the workbench is actually sized to fit me, which means it is a little shorter than the Workmate.  But by using a set of bench cookies (from Rockler) and raising the Workmate slightly I had it roughly equal heights on both sides of where I was going to cut.

Using bench cookies to get the level right
Supporting the wood on both sides

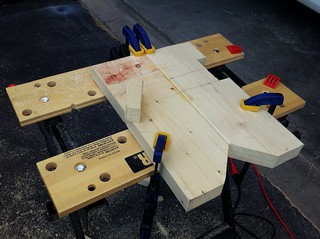
I don't have a table saw or a circular saw, so I was using a jigsaw, which is really not suited for long cuts.  I used a metal ruler to be my guide.  So each cut started out with me placing the jigsaw, the guide next to it, then my combination square to get the metal ruler going straight across the board.  I then clamped down the ruler and made the cut by having the jigsaw follow the guide.

Setting up a cut for a jigsaw
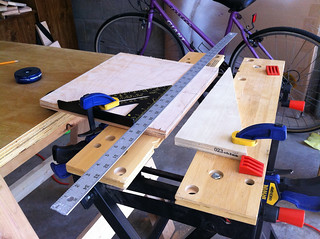
Cutting the board using a guide for the jigsaw
The cuts were supposed to be the hard part.  Especially since jigsaw blades are known to wander around on long cuts so while the cut may be straight at the top, the unsupported bottom is moving around so the cut is usually not straight all the way through.  But with a step stool, the next part is attaching the legs to the supports and the steps.  And getting started was a trick.

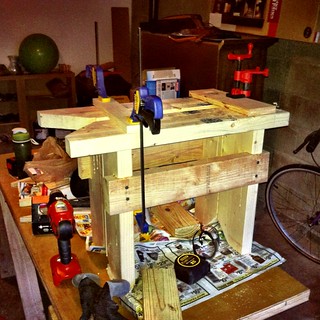
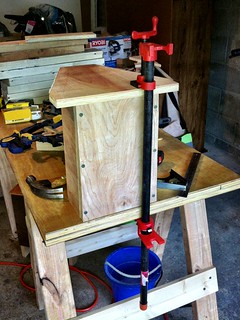
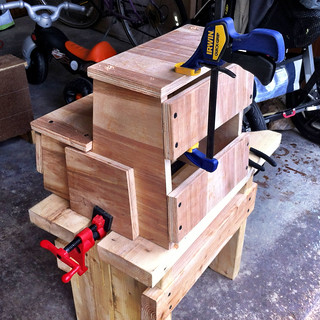
I started by attaching the stretchers to the sides.  First I clamped one side in the Workmate so that the back was exposed and level with the Workmate surface.  This let me attach the sides to the back of the Workmate.  Next, I used my sawbench and pipe clamps to hold one side of the stool while attaching the stretchers to the other side.  My cross cuts for the stretchers turned out pretty bad, while my rip cuts on the sides were pretty good, so I aligned the stretchers using the sides, and ignored the fact that top and bottoms of the stretchers were messed up.

Supporting sides up while driving in screws
Supporting step stool side with the pipe clamp on the sawbench
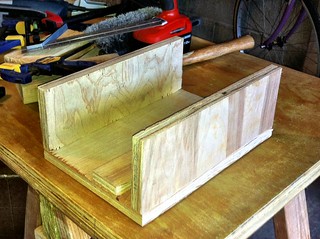
After the sides, then came the steps.   Now, the jigsaw is pretty bad about making straight, square cuts, but it turns out that in this design, the sides are not vertical either.  So, of my two steps, I looked for the one with the edge that slanted just like the step cuts and made that the bottom step.

Putting on the steps
Now to attach the steps.

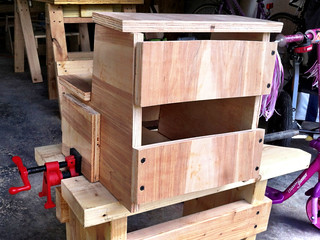
So now I have an assembled two-step step stool.  After this, I used a rasp, then file, then sandpaper to round off all the edges.
Two step stepstool assembled!
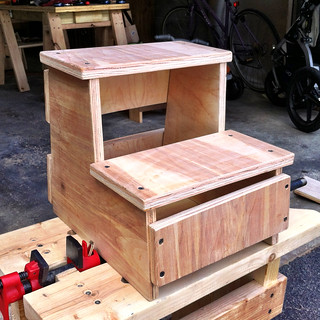
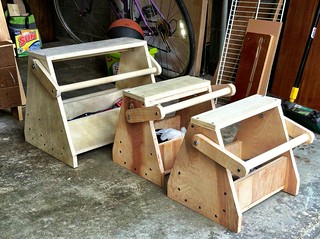
Assembled step stool
Next step is to finish the wood.  I'm going to put on Danish oil, because that is what I have lying around, and let that sit overnight.  Then we get to see if T uses it.

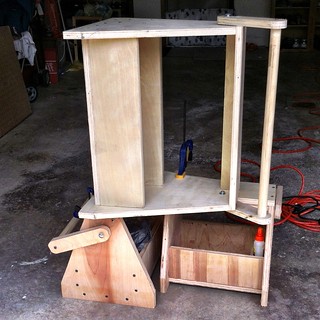
Some room for improvement.  The original plans have the supports in between the legs, not attached to the ends.  Maybe if I have time someday I can take out the supports and re cut them (they are pretty messed up) and do this the right way.

Saturday, July 13, 2013

Python Cookbook, 3rd edition by Beazley and Jones - Book review

Python CookbookPython Cookbook by David Beazley
My rating: 5 of 5 stars

The third edition of Python Cookbook is part of what seems to be a general trend of issuing new editions focusing on Python 3. For me, whose focus is on data analysis and technical computing, this is the time to be thinking about the change from Python 2 to Python 3 as the base libraries of Numpy, Scipy, Matplotlib, and iPython have been ported, and the various other libraries I use that depend on these are being ported as well. But this edition is not just porting the old cookbook, it is a complete rewrite to go with the big shift that was Python 2 to 3. Because a lot of what I used the old cookbook and many of the recipes at the ActiveState website was for handling issues related to crossing versions (I had some projects with Jython, which was several versions behind CPython) and ways of getting around issues that are purportedly solved in Python 3. For that the third edition of Python Cookbook fills its purpose of showing idiomatic ways of performing some programming tasks, and being a reference for how to do thing well and elegantly taking advantage of the language and libraries, not fighting it.

I focus on using Python as a data analysis platform. So I generally only learned as much of the language I needed to in order to use the scientific stack of Numpy, Scipy, Matplotlib, Pandas, and the libraries that were built around them. But that means that I have not gotten to know large portions of the standard library. And introductory books don't cover this either, they focus on using the language itself. There are also a large number of books and references that focus on Python as a web development tool or a system administration tool, so those parts of the standard library get a lot of coverage in teaching materials. But the rest you almost have to stumble upon. In ideal conditions, the way you would learn about much of the standard library is to have someone who was more experienced nearby show you what you needed to know, as she demonstrated methods in her code that did the things that you never learned in class. But sometimes there is no such person. The Python Cookbook plays this role, of demonstrating how to do things in Python 3 that are practical and you probably would not learn while learning the language itself.

Some areas that I found useful are the heapq, generators, and the I/O. heapq is a module and data structure I just never got around to learning. Usually discussions about Python data structures made their way to deque and heapq was discussed by reference. But after looking at the priority queue discussion, I fired up an iPython notebook and went through every recipe that used heapq and I've started thinking about how to rewrite a model I recently coded up. Generators and File I/O are areas that I knew in passing through my use with them in data analysis, but Python Cookbook opened up new ways of understanding (I am starting to get why JSON is so useful). Now, there is nothing special about these, but seeing these parts of the standard library in use in an elegant way is something beyond what you would get from a module documentation or a standard tutorial.

I do miss the introductions to each chapter that was in the 1st and 2nd editions of Python Cookbook. But what Python Cookbook does give is an idiomatic feel of using Python3, when there are not all that many mentors out there to go around. So this is something very useful for others who are starting to use Python 3. It is not for learning the language, but it is for using the language well.

Disclaimer: I received a free electronic copy of this book as part of the Oreilly Bloggers program
I review for the O'Reilly Blogger Review Program
View all my reviews

Sunday, July 07, 2013

My version of the New Fangled Sawbench

We have a few projects going around the house. One thing I've noticed is that my father-in-law does not use the workbench. He sometimes uses the Black & Decker Workmate for some detail sawing, but he uses some small stools he made up when doing any major cuts. The issue is that the workbench and workmate are too high for doing hand work. Enter the sawbench.

The modern advocate for sawbenches is Christopher Schwartz at Popular Woodworking Magazine. An he has many iterations on sawbench design and use at that site.

The purpose of a sawbench is for using handsaws. To do this properly, you need to be able to use your weight to hold the material steady and to cut. And the traditional workbench that is about wrist high is really for planing and power tools and is too high for this. The sawbench should be about knee high so you can kneel on top of material on top of the workbench. In addition, some designs have a notch at the front for use when ripping boards (cutting with the grain). Some have a slot in the middle for supporting pieces on both sides. Some have splayed legs, others straight. I choose to use a design from the Timber Frame Tools blog, which is based on a design at the Dan's Shop blog. This version is made up of 2X6s (with 2X4s for stretchers). I liked the idea of straight (thick) legs, so I could use it as an actual sitting bench as well. And I have not gotten to the point I could cut good mitres with any degree of accuracy.

I got a 10' 2X6 from the local Lowes, and they cut it down for me. I was going for 24" top, and 17" tall. The height was based on me going around the house and kneeling on chairs until I found one that seemed to be the right height for kneeling, with allowances for shoes and some material thickness. The length was based partly on the fact that I needed everything to fit in a 10' board, and by the fact that this is going to have to live underneath my workbench and the workbench top was 24" deep.

Step one is to make the legs. Each leg is made of edge glued 17" 2x6s. There is a notch in the bottom of the legs to help with stability (I don't think there is any flat-level surface in the house, the space here helps keep the rocking under control.) In addition, I cut notches where the top will go, with a spacer in the middle. The slot in the spacer will have a 1/2" pipe clamp, to serve as a vice.


Glueing legs together

Next for the legs is to cut some notches for the stretchers. One option is to put the stretchers up against the top. I chose to put them a couple inches below so that I would have some room for clamps in any direction along the top.

Notches in legs for stretchers

Next to work on the top. The boards were somewhat cupped, so I (and my father-in-law) spent some time planing them smooth. I put a notch in the top as well. While I could say that it is for ripping wood, the real reason is that I found a split in one side of the top, and cutting out the notch to get rid of the split.

Now that the pieces were all cut, time to put everything together. First the stretchers. The notches were good enough so that they fit in snug, and I could test the placement. The stretchers were sized to be a 2x4 we had laying around cut in half, so 19". I made it so that it was about 1" behind the notch in the front, and 2" from the back. These were then put in with glue and then I screwed them in. Next was the top. Since the notch for this was sized, this was glued on as well. For this, I wanted the glue to harden before screwing them in. (I did not worry about the stretchers because the fit was so tight the screws were not going to knock them out of alignment.) Then I clamped everything together with speed clamps and a pipe clamp.

Glueing on the top

The next day, I put in screws help hold the top to the legs.  First, I used a 1/2" spade bit to make a well for the screw (to keep the screw head below the top of the bench).  Then used the cordless drill to drive in the screws.


Pipe clamp and bench dog holes

Last step, I put in two pairs of bench dog holes. These are to work with the pipe clamp to serve as a vice for holding material. (something I have not put onto my workbench) I rather like the pipe clamp trick. The idea is what is usually the backside can rotate in any direction, so you use the clamp side to hold onto the workbench and the back side to hold the material (or the reverse). The bench dogs can also be used to hold material against the clamp. The pipe clamp I got already had padding, so a wood block is optional. (or if I want a wide surface to clamp with)

Finished sawbench

At the Timberframe Tools site, he gives this an alternative name as the "Toddler's Workbench", because it looks like a small version of a real workbench (straight legs, bench dog holes) so his son can play with it. So does mine :-)

New Fangled (AKA Toddler) Saw Bench

Some things for next time around. I need to learn how to cut notches the long way through lumber. It would be better if the top had a slot so that it was seated in the legs so there is wood providing lengthwise support, not only glue and screws. Also, I messed up the slot in the middle. I needed it to be the width of the clamp housing, not the with of of the clamp (or of a board which was used in the original design). I got it to work by going back and making the slot wider, but I could have used that width to make the pipe holder slot stronger. I'll probably stain it with Danish oil. And after I've used it a few times with bench dogs, I may put in another pair or two of bench dog holes. But I'm happy with this one.

Friday, July 05, 2013

Scaled down versions of the Handyman tool tote

The tool-tote (plans at the Handyman club) I had made a while back had one problem, it was big.  The reason it is big is to have an 18" box, which is big enough for most full size hammer.  In addition, it was trying to get the top high enough so that you can use it as a work surface where you can kneel on a board on the top while working with it.  And that means it has to be wide enough to be stable.  All that means that my wife won't use such a thing.  So we're giving it to my father-in-law, who needs a tool box and a stable work surface, and I'm going to make a couple more smaller versions for us.

Completed tool tote / sawhorse
Looking at the scrap, I figured out how a layout where I could make two boxes with the leftovers from this and the workbench and a single 2' X 4' piece of plywood.  So my wife goes to get the plywood.  And the guy who was helping her completely mangles the thing.  I had a layout so that if you made four 12" x 12" boxes in a square pattern on one half of the board, you would use the remnant that would be slighly less than 24" x 24" for the rest and there would be waste at the end.  Instead, he decides to make 12" boxes straight across the long way.  And he was using a board that was 24" wide, but 47 1/2" across, so that means that the last board would be 12" wide, but significantly less than 12" long.  And it also means that the rest of the pieces would be hard to cut out.  (big box stores generally don't mind doing cuts in plywood and lumber as long as they are straight through cuts)  This meant that I had to do some tinkering with the design to make it work with the cuts he gave us.

So, basic idea is to make two bins.  Both 12 3/4" high  (12" + the width of a plywood topshelf).  And the other dimensions whatever would work.  In particular I ended up having one top be 4" wide and the other 5" wide (the original goal was to have them both 5" wide).  And the box would be 12" long (instead of 13") and 8" across.  Because the top piece was across the top of the sides, it would actually be quite stable and strong (i.e. you could stand on either one without worry).

Box for the tool tote

This time was much smoother, the benefit of having done this before, and now I have a few more clamps and other tools that I've been accumulating while doing other projects.  And my general skill level with measuring, layout, and cutting has been improving.

Using a pipe clamp to hold the sides for screwing in

After the box is put together, next came the handles.  This worked well the last time, so this time with four handles to make it was practically a production line.  The Workmate acquitted itself nicely again to hold the handles for both rounding the handles as well as making the necessary holes for the bolt and the handle dowel.

Making the handles on Black & Decker Workmate

Finally the completed project.  It is incredible what a difference 2/3 scale makes.

Tooltotes next to full size model

And the reason for doing two of them:  so that I have the equivalent of two short sawhorses.  In this case I wanted to cut out a notch on the bottoms of the original version so that it be less prone to rocking on non-smooth surfaces.  Normally this would have been a problem because the handle would get in the way of putting it on my workbench top.  But with the tool tote/sawhorses I could lay it across the two of them and clamp them so I could work.

Scaled down tool totes in action

So now, we're passing on the original to my father-in-law so he could use it as a tool storage and a small workbench, and we have two short boxes. My wife is using hers for paint and gardening stuff.  I'm using mine to store measuring things.   A nice quick project.

Thursday, July 04, 2013

Interactive Data Visualization for the Web by Scott Murray: Book review

Interactive Data Visualization for the WebInteractive Data Visualization for the Web by Scott Murray
My rating: 4 of 5 stars

This is really a d3.js (Data Driven Documents) book, since the entire book is about using the d3 Javascript library for data visualization. For me, coming in with a background in data analysis but no practical Javascript background, this provided a good overview of many Javascript/web concepts required then the d3 library.

My background in data visualization is R (ggplot and lattice) and Python (Matplotlib). I find Excel too limiting and Matlab inflexible. But what I'm used to are descriptions of visualizations that are then implemented. d3 is different, it makes you specify the form of the visualization and makes you work at a very low level (which is what ggplot and Matplotlib are trying to avoid). But this provides room for great creativity, and learning how to do this is the point of this book.

This book does a good job of introducing enough of the background technologies of Javascript and the web to make d3.js useful. This was always the reason I never got around to actually using Javascript, I never learned all the things you needed to know to make it useful. For example, I now think I understand JSON well enough that I can see using it as a data store for data frames instead of CSV or SQLite or pickles (Python).

I come at this as someone who already does data analysis, but may need more ways of delivering the products of the analysis to others. And this has promise as a means of this delivery through a browser, which is already comfortable for most. And this book does a good job of working both the subject of d3.js and the web ecosystem that it is a part of to get to someplace useful.

Disclaimer: I received a free electronic copy of this book as part of the O'Reilly Blogger Program

View all my reviews at Goodreads.

I review for the O'Reilly Blogger Review Program

Monday, July 01, 2013

Parenting Month 32: Learning from elders

Two events this month.  We had our regularly scheduled grandparent line change where my mom left and S's parents came in for their long shift.  And we went on vacation!

This month was about learning by observation.  The Handy Manny phase is still going strong, and with him watching ye-ye (grandfather, yes, he gets the wrong one but it is the spirit that counts) and I make things.  It is really funny how he gets some real particular details just right (making motions of using pliers to hold nails for the first few taps, measuring out wood with a tape measure, turning screwdrivers).  He has also figured out that the power tools take the place of certain hand tools, but they have him a bit of a loss (he does not have any power tool toys).  Same with gardening as we have started a garden now that the frost has ended.


I wonder if there are any worms in here

But the real imitation comes from other kids.  Kids at day care.  And especially on vacation.

Our trip this summer was back to Chicago.  And T got to play with his cousin P' J. We had one day where we took  J and T out to play at a playground, then we took him to the Peggy Notebaert Nature Museum in Lincoln Park, Chicago.  There was a water exhibit to demonstrate the workings of rivers, irrigation, locks and dams.  The animal exhibit with live snakes and turtles.

Look, there is a snake in here

The winner was the butterfly garden.  Both J and T were pointing in every direction yelling "look! look!"


P1060036

P1060029

And like a proper museum whose serves children, there was an area for the kids to burn energy.  T likes following J around (J is 2 1/2 years older).

I can see you!

We also went on another day to the Kohl's Children's Museum in Glenview.  And J and T even played drums together (J being the leader giving the count, since he is the experienced drummer of the two)

The cousins drum section

While this was a lot of fun for J to play being the big brother, this seemed to get old as our visit went on.  You can tell J was trying to make sure he was getting attention as he was talking near constantly and making sure we were paying attention to him.  It is not as hard as if there were two older kids who each want to have their own conversation topic as T does not really care what kind of attention he is getting as long as he is getting some.  And eventually, J started getting possessive of his toys and not wanting Nong T to play with them.


Cousins playing with blocks together

But T loves being around J.  T likes to express how happy he is by giving a roll call.  "Mommy and T", "Daddy and T", "Mommy and Daddy and T!".  Or an especially happy time is "Mommy and Daddy and Lau-Lau (grandma) and Ye-Ye (grandpa) and T!"  During this visit, J was added to the roll call  "Mommy and Daddy and J and T!"

Of course, there are other habits to pick up too.  Trying to whine and bargain like J.  We had lunch with four year old N and N taught T how to stick out his tongue.  And general screaming while running around in the house (we have to remind him 'no screaming - - - inside')

This is another fun trip to Chicago.  Running around the city with family.  Visiting old friends and experiencing new places.  And even the traditional running into random person along the way :-)